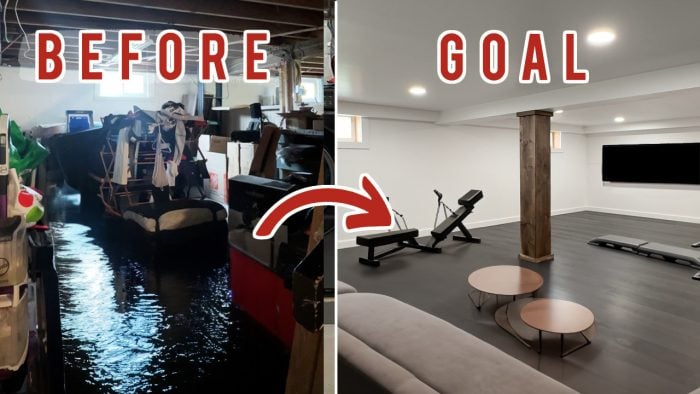
Well friends, we had a crazy storm and it really did a number on our basement. But we didn’t let it stop us! After completing the laundry room renovation the rest of the former flooded basement was up next. Just wait until you see the dramatic transformation this space went through. It’s honestly hard to believe that it’s the same space we started with.
This project is part of my flooded basement to dream-basement renovation series so if you want to see some other projects that I’ve done in the basement make sure to check them out on my channel and also stay tuned for more in the basement series coming soon!
This post contains affiliate links, which help support more projects on my website! For my full disclosure policy regarding affiliate links, click here!
Want to see this build in action? You can watch my build video here (+ make sure to subscribe to my channel)!
TOOLS + MATERIALS
FLOORET
- Flooret Modin LVP in Queensbury – Order the Dark Samples Kit which contains Queensbury for 50% off with code DIYHUNTRESSFLOORET
MATERIALS
TOOLS
- Paint Brush
- Painting Supplies
- Sander
- Miter Saw
- Drill/Driver Set
- Nail Gun
- Track Saw
- Dust Vacuum
- Construction Adhesive
- Insulation
- Drywall
1. Flooding, Demo, & the Game Plan


First thing’s first, we had to have the basement waterproofed, so I called in some specialists to take care of this. We even added a French Drain to help with any future water issues we may have.

Like any good basement ours houses a lot of our stuff. So in order to get this project going I had to move everything out of the way.

Aside from the laundry room area that you can see in this video, I am opening up this entire space to make it one big open concept area for a home gym. It’s gonna be a project friends.
2. Framing & Drywall


Dad and I framed out the basement together and you can see a lot more of this part of the process in the laundry room video so be sure to check that one out to see how we did it.

After being really behind on projects I did have to make the decision to call in my contractor’s crew to drywall the rest of the basement and the ceiling. Honestly, it was hard to ask for help but I’m so glad I did, they did a beautiful job and now we can get on to the rest of the project!

There are a couple of supports that hold up our house and I decided to enclose the area between them to create a pantry space since we don’t have any closet space upstairs.

We’ve also now got an enclosed storage room around the boiler.

Surprise! I also had to order a new staircase because, spoiler alert, the previous staircase was super unsafe and had to go. I wasn’t expecting that extra expense but I’m glad we made the switch.
3. Painting the basement


First, I had to prep the space for spraying. I didn’t care if the floors got overspray on them but as for things like the light fixtures and the new staircase, I wanted to cover and protect those.

I also had to cover and protect myself…ha.

I sprayed primer first, as we always do before we paint.

Then after primer I did a couple of coats of paint.

The stairs came pre-primed so I also wanted to add a coat of paint to them.

It’s incredible how paint can really transform a space. I’m in disbelief that this is my house!
4. Installing the Flooring

I decided to go with vinyl plank for the basement flooring and I am so happy with my choice.


I did have to install a moisture barrier on top of the concrete and under the vinyl plank. This prevents any moisture from seeping up from our concrete floor and onto the flooring itself.


At this point it was time to start installing the flooring by tapping them into place and marking out where to make cuts.

I was able to use my miter saw to cut each piece, this made the process a breeze.


Flooret has a tongue and groove system that makes it super easy to click the pieces into place.

And then from there you just tap each plank into the piece that went in before it.

It was super easy to use my jig saw to cut out holes for where I had to work around the support poles and the staircase.

I love the color that we chose and they really do look like real wood floors. But vinyl plank is a great option for a space like a basement because they do handle moisture well. I mean, we better not have any more moisture in this basement after the waterproofing that we did. But you know, we’re prepared if anything should happen.

The trickiest part was installing the flooring under the stairs. It probably would’ve been a better idea to install the floors before installing the staircase…but hindsight is 20/20.

Such a dramatic transformation and I couldn’t be happier with how the floors look.
5. Finishing Touches

I added some trim to the walls with my brad nailer.

Of course I caulked along the top edge to give it a nice smooth finish.

I also added some access panels where we needed to reach shutoff valves and other important things that would otherwise be behind drywall.

I painted these the same color as the wall and also caulked around the edges.

Before I could wrap this project up I had to do something with the support columns so I added some wood around them. To be honest I’m not loving it.

I did end up staining this wood, but it’s still not doing it for me. So I’m open to suggestions, if you’ve got an idea for how to make this column not such a bold statement in the middle of the room, or some other creative solution let me know, I’m all ears!
Final Reveal


Let’s take a moment to walk down memory lane and remember how this project started. Yikes.


And look at it now! I’m almost in disbelief!
What a labor of love this space has been. Between the laundry room and now the floors I am truly in awe of the transformation this space has had. I still have more custom projects for this basement space, from custom doors, to custom built-ins, to furniture and a whole bunch more. So stick around, and be sure to subscribe to my YouTube Channel. You’ll want to keep an eye out for the next video and blog coming soon. Happy DIYing friends!
Save This for Later
I hope you enjoyed this project! If so, make sure to Pin It for later!