Skip to content
  • About
  • Blog
  • Archives
  • YouTube
  • Apparel
  • Plans
  • Policies
  • Contact
  • About
  • Blog
  • Archives
  • YouTube
  • DIY Huntress

  • Apparel
  • Plans
  • Policies
  • Contact

Tiling Our Small Bathroom Floor!

April 2, 2022 Sam 4 comments
Tiling Our Small Bathroom Floor!

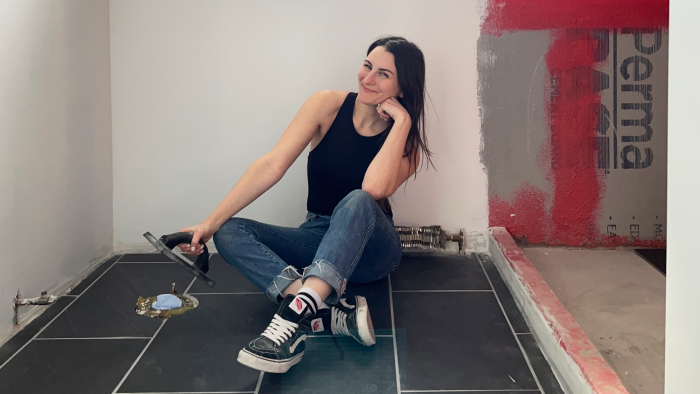
Our bathroom remodel in our NEW HOUSE is well underway now that we only have a few weeks until we move in (cue the panic)! A few weekends ago, I published a full demo video on my YouTube channel and today I’m spilling the details on the plans for this project as well as the process of tiling our small bathroom floor with large format tiles!

How To Tile A Small Bathroom

Want to see this project in action? Check it out on my YouTube channel (& make sure to subscribe)!


Missed the bathroom demo video? Check it out here!


Quick disclaimer before we jump on in – every floor and every project is different. I did SO MUCH research and talked to a whole bunch of pros before tackling this project. That being said, the methods I used may not work for your particular project, so please make sure to do your own research before starting your project!

That being said, let’s get started!

What I Used:

Tools
Tiling Trowel
Grout Float
Tile Saw
Angle Grinder & Diamond Cutting Disc
Mixing Paddle & Drill
Tape Measure
Grout Saw
Bucket
Sponge
Level

Materials

Subfloor Prep:
DITRA Membrane
Kerdi Band
Schluter All-Set

Tiling:
12 x 24 Black Porcelain Tile
(I Sourced Mine Locally – Find Similar Tile Here)
Schluter All-Set
Gray Grout
3/16″ Spacers
Tile Cleaner

The Steps:

1. First, I had to prep my subfloor. Dad and I did this by installing & leveling 3/4″ plywood over the top of the existing floor planks. I then installed my uncoupling membrane & Kerdi Band to prep for the tiles. I’m no pro at this step (this was my first time using this system, but Schluter’s videos on their YouTube channel came in handy during install)!

2. After letting the membrane dry, I spent the next afternoon running a dry layout of my tiles. Making sure to trim any tiles using my tile saw (or, my angle grinder for non-linear cuts like around the toilet flange).

3. Once I was happy with the layout, I attached the floor permanently using thin set & tile spaces. This was a messy process, so I made sure to keep a damp sponge around to clean up as I tiled.

4. After letting the floor dry, I used a grout saw to clean away any excess tile compound from in between the tiles and then grouted the tiles using my float. I used a damp sponge to wipe away the excess and later that night did another pass with a clean sponge.

5. Once the grout was dry, I used a tile cleaner to remove any excess grout haze.

And, after a few days, I was done!

This bathroom has been a labor of love, but it’s finally starting to come together and I’m so, so excited! 

If you’re as invested in this project as I am, make sure to subscribe to my YouTube channel for video updates! In the meantime, don’t forget to Pin This post for later!

Until next time, friends!
OTHER PROJECTS YOU MAY LIKE

  • How To Hack Your Next Tiling Project
    How To Hack Your Next Tiling Project
  • dream bathroom
    I Turned My Bedroom Into A Bathroom
  • Sam Featured Photo Ratio (1)
    DIY Luxury Tiny Home on Wheels Part 1: Demo
  • dream bedroom makeover
    Finishing Our Dream Bedroom After a Year of Renovations
  • easy closet organization
    DIY Organization Hacks for Small Closets
  • cargo van tiny bathroom
    How I Built The World’s Smallest Bathroom In My Cargo Van
bathroomhome improvementYouTube

Related Posts

DIY Faux Brick Wall: Create an Authentic Industrial Loft Look
DIY Luxury Furniture For Cheap
I Turned My Bedroom Into A Bathroom
Finishing Our Dream Bedroom After a Year of Renovations

Post navigation

DIY Modern Geometric Accent Wall
DIY Small Entryway Makeover

4 comments

  1. Adam says:
    April 4, 2022 at 11:25 AM

    Your the second person I’ve seen use the orange Schluter’s tile underlayment. How did you find the height of the floor (in contrast to the hall) when you finished? was it difficult to figure out? just curious of any difficulties with using underlay to be able to get a good idea of how height changes with the 2 layers of morter(under and over the underlay) + underlay + tile.
    The white grout on black tile is a tough one because it will show any blemishes more easily than like colors, so big cudo’s on filling the joints properly, you wouldn’t believe how many paid contractors I’ve seen butcher a decent tile job with not filling the joints properly.

    Reply
  2. YIGII says:
    April 11, 2022 at 2:32 AM

    The tiled floor in your bathroom looks great!

    Reply
  3. Tile Installers Portland Oregon says:
    July 1, 2024 at 12:42 AM

    Great Blog! Tiling our small bathroom floor can really transform the space! It’s a great way to add style and durability, especially in a high-moisture area like the bathroom. Looking forward to seeing the final result!

    Reply
  4. Bathroom Remodeling Portland OR says:
    July 23, 2024 at 5:50 AM

    Your small bathroom floor tiling project turned out fantastic! The step-by-step process and tips you shared are incredibly helpful for anyone tackling a similar project. Thanks for the great inspiration and practical advice!

    Reply

Leave a Reply Cancel reply

Your email address will not be published. Required fields are marked *

This site uses Akismet to reduce spam. Learn how your comment data is processed.

Hey, Friends!

Hey, Friends!

Sam Raimondi

Welcome to my website! Here you'll find approachable DIY projects that you can complete on tight timelines and with tight budgets!

YOUTUBE

https://youtu.be/tIb58R1yHiA

PROJECT PLANS

Find printable, PDF plans for my woodworking projects in my online store!

Shop Now
PROJECT PLANS

Categories

  • Camper Van
  • Crafting
  • Holidays
  • Home Improvement
  • Metal Working
  • Room Makeovers
  • Search
  • Tool School
  • Woodworking

Subscribe

Stay up to date via our weekly newsletter.

Popular Posts

Home Improvement ➤ June 24, 2026

Building A Floating Deck + Grill Station (In One Weekend)!

Looking for a dedicated grill station? Build a floating deck for your grill in just one weekend of work! I have wanted to purchase a grill for our backyard since the day we closed on...

Read More
Home Improvement ➤ April 13, 2026

Easy DIY Deck Privacy Wall

Winter was way too long this year but we are living for the warmer weather that's started to creep back in. There's truly no better way to mark the warmer seasons than to tackle an outdoor project. I always get questions on the privacy wall that I built around my deck and it's still one of my favorite parts of my outdoor space. It deserves it's own moment to shine in the sun. Take a look at how I did it!

Read More
Woodworking ➤ June 24, 2026

DIY Outdoor Dining Table (IN ONE DAY)

It’s outdoor season, which means we’re looking at all the projects we can tackle outside. For this build, we teamed up to make a DIY outdoor dining table for DIY Danie's backyard, and I love how it came together. This project is beginner-friendly, and totally doable in a weekend, or one very productive day with a friend.

Read More
Home Improvement ➤ June 29, 2026

DIY Easy Storage Shelf (For The Side Of My Fridge)!

Need a little extra storage in your kitchen? Make use of that empty space beside your refrigerator by building an easy DIY storage shelf. It’s perfect for organizing cutting boards, wine bottles, and all those miscellaneous kitchen items that never seem to have a home. Best of all, you can knock this project out in one weekend or less!

Read More
  • About
  • Blog
  • Archives
  • YouTube
  • Apparel
  • Plans
  • Policies
  • Contact
© 2026 | diy huntress