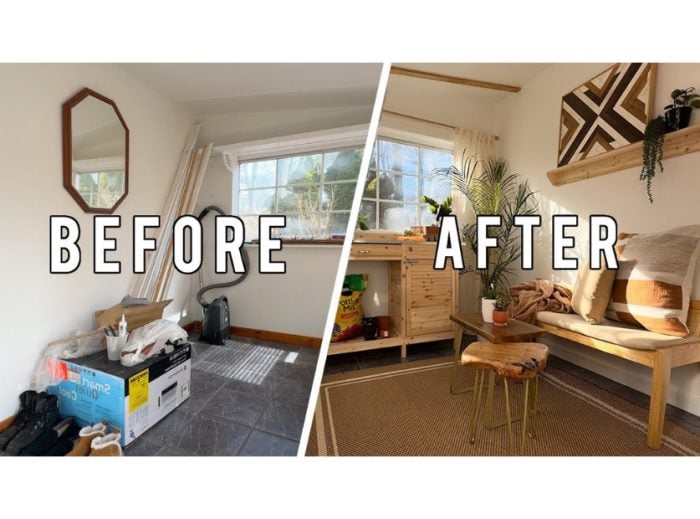
Hi friends! This one is going to be a quick adventure! If you’re new here, you might not know that I have been helping my little brother renovate his first house! For this particular project we had the task of turning his tiny entryway into a multipurpose space. We’re talking about a hangout spot, a hobby spot, an indoor garden and a functioning sun room. No big deal, right? I only had one weekend to do it and a very tight budget. So here we go with very simple and easy upgrades to get maximum results, let’s get started!
This post contains affiliate links, which helps support more projects on my website! For my full disclosure policy regarding affiliate links, click here!
Want to see this build in action? You can watch my build video here (+ make sure to subscribe to my channel)!
Tools + Materials
Tools
Materials
- BEHR Paint
- Bench
- Curtains
- Curtain Rods
- Hampton Bay Rug
- Husky Trowel
- Gardening Gloves
- Light Fixture
- Microfiber Cloths
- Miracle Grow Soil
- O-Cedar Mop
- Painting Supplies
- Plants
- Potting Bench
- Windex
- Spackle
1. Demo/Clean Up


Demo for this space was pretty quick, just a little clean up and taking down some window decorations.

I also took down these shades and planned to repurpose them in the bathroom. Since this space will be housing plants it needed maximum sunlight.

The prep work really required more patching and sanding than demo. So this spackle was the MVP because it dried so quickly. Key for a project with a tight timeline.
2. Paint

You probably already know this, but painting is one of my favorite ways to make a big impact on a space. It’s not an expensive upgrade, for a small room a gallon can be enough, and it can really make a huge difference. This paint shade didn’t look very different on camera but it was a creamier neutral beige color in person and really changed the space.

I originally wasn’t going to paint the ceiling but I decided that I had to. I’m only 5’1” and you can see I’m very close to the ceiling, I don’t think these are even true 7′ ceilings. But when you paint the ceiling the same color as the walls it can trick your eye into thinking the room is taller than it actually is. So I decided that was a necessity.
3. Easy Wood Beam Ceiling Hack

For this next part of the project I had to bounce back and forth between upstairs and the literal dungeon of my brother’s house where we have the miter saw set up…not glamorous at all and clearly a tight space.

I used the table saw to put grooves in the bottoms of the 1×3 boards and then I took them to the miter saw to cut them to size.


Then we used the grooves to fit them to the existing “beams” in the ceiling and we used the brad nailer to attach them.

Next I stained the beams. I knew I was going to do touch up paint otherwise I would’ve stained them before installing them.

These really dramatically changed the look of the room. You could nail beams like this to a ceiling even if you didn’t already have existing “beams” to cover. You wouldn’t need to cut grooves into them, so it would be even easier.
4. Decor

Rob and Marina did their homework and assembled their potting benches. The space is tight so I’m going to have to play with the layout. But having them assembled was a big time saver.


Another easy upgrade that can really change a space is the lighting. It does take a bit to know how to do it and feel comfortable, but a new light fixture makes such a difference. I also added some caulk to the beams to clean up the edges and make everything look neat.

Then it was time for new curtain rods. I used a level to make sure everything was nice and tidy.

A new rug also made a huge difference without having to go through a huge flooring renovation.


I really wanted to make sure we had lots of plants in this space, so I added a shelf with a small succulent and placed accent plants all over.
The Reveal


In terms of layout, I opted to only keep one potting bench and added a small bench for them to be able to sit on and enjoy their coffee in the mornings. This fit the space much better and also fit their wants for the room.


As far as weekend projects go, this room couldn’t have come out cuter! I am so freaking happy with the results. It didn’t take us a lot of time and honestly if we didn’t cover the beams I wouldn’t have even needed a saw. I hope you love it as much as Rob and Marina do, it’s the sunniest little space for them to drink their coffee, tend to their plants, and enjoy their home.
Save this for later
I hope you enjoyed this project! If so, make sure to Pin It for later!